Saturday, February 21, 2015

The Wonderful World of Disney Waffles!


First I would like to disclaim that in no way am I affiliated with Disney Corp., I am just a huge fan and lover of Disney Culture. There are quite a few websites and blogs that have the "Official Mickey Waffle" recipe, listed below. Also I know there is a Disney World Cook Book I have yet to purchase (and will, believe me I will), that will have this recipe as well. Research sites I used for today's entry are:
http://www.thedisneychef.com/2012/06/mickey-waffles.html
http://www.disneyfoodblog.com/2009/04/25/mickey-waffles/

At the risk of exposing how truly spoiled I am let me tell you that some of the greatest memories I have took place at Walt Disney World. My whole family adores WDW and most everything it has to offer; whether it's the great rides, shows, character experiences, made on site candy, unique and outstanding food offerings, or the great opportunities for family bonding, WDW has something for everyone all of the time.

If you're staying 'on campus' or just plain arrived early enough for breakfast, most Disneyphiles go ape over the waffles. But not just any waffles, they go ape over Mickey Waffles! People who haven't experienced these gems before most likely are saying "So what, they're waffles". I can say to the skeptics you won't feel that way after you've tried them.

Most waffles you will experience are pretty much glorified one note carbohydrate receptacles for butter, syrup, whipped cream, fruit, or whatever other topping you wish. Great waffles on the other hand should have flavor and texture that they bring to the party. Mickey Waffles are great waffles with the added benefit of being the shape of every Disney Nerd's favorite mascot.

For those who do not own, and/or do not plan on purchasing a Mickey Waffle Iron, this recipe will absolutely make outstanding waffles for you and yours. I will say though, Mickey Waffles really do bring an element of fun to the meal for the whole family. Yes I am 33, no I am not ashamed, yes I will always be excited to have Mickey Waffles whether I am at home or WDW. Deal with it.

For this recipe you will need:

Ingredients:
4 Separated Eggs
2 Tablespoons Sugar
1 Cup Milk
1/4 Cup, Or 1/2 Stick Of Butter Melted And Cooled
1 Teaspoon Vanilla Extract (Not Imitation)
2 Cups All Purpose Flour
2 Teaspoons Baking Powder
1/2 Teaspoon Salt

Equipment:
Two Mixer Safe Bowls
Whisk
Electric Hand Mixer
Measuring Cups, And Spoons
Ladle
Non Stick Spray
Waffle Iron (Mickey Shaped)

Begin by plugging in your waffle iron of choice, closing it, and letting it get nice and hot.


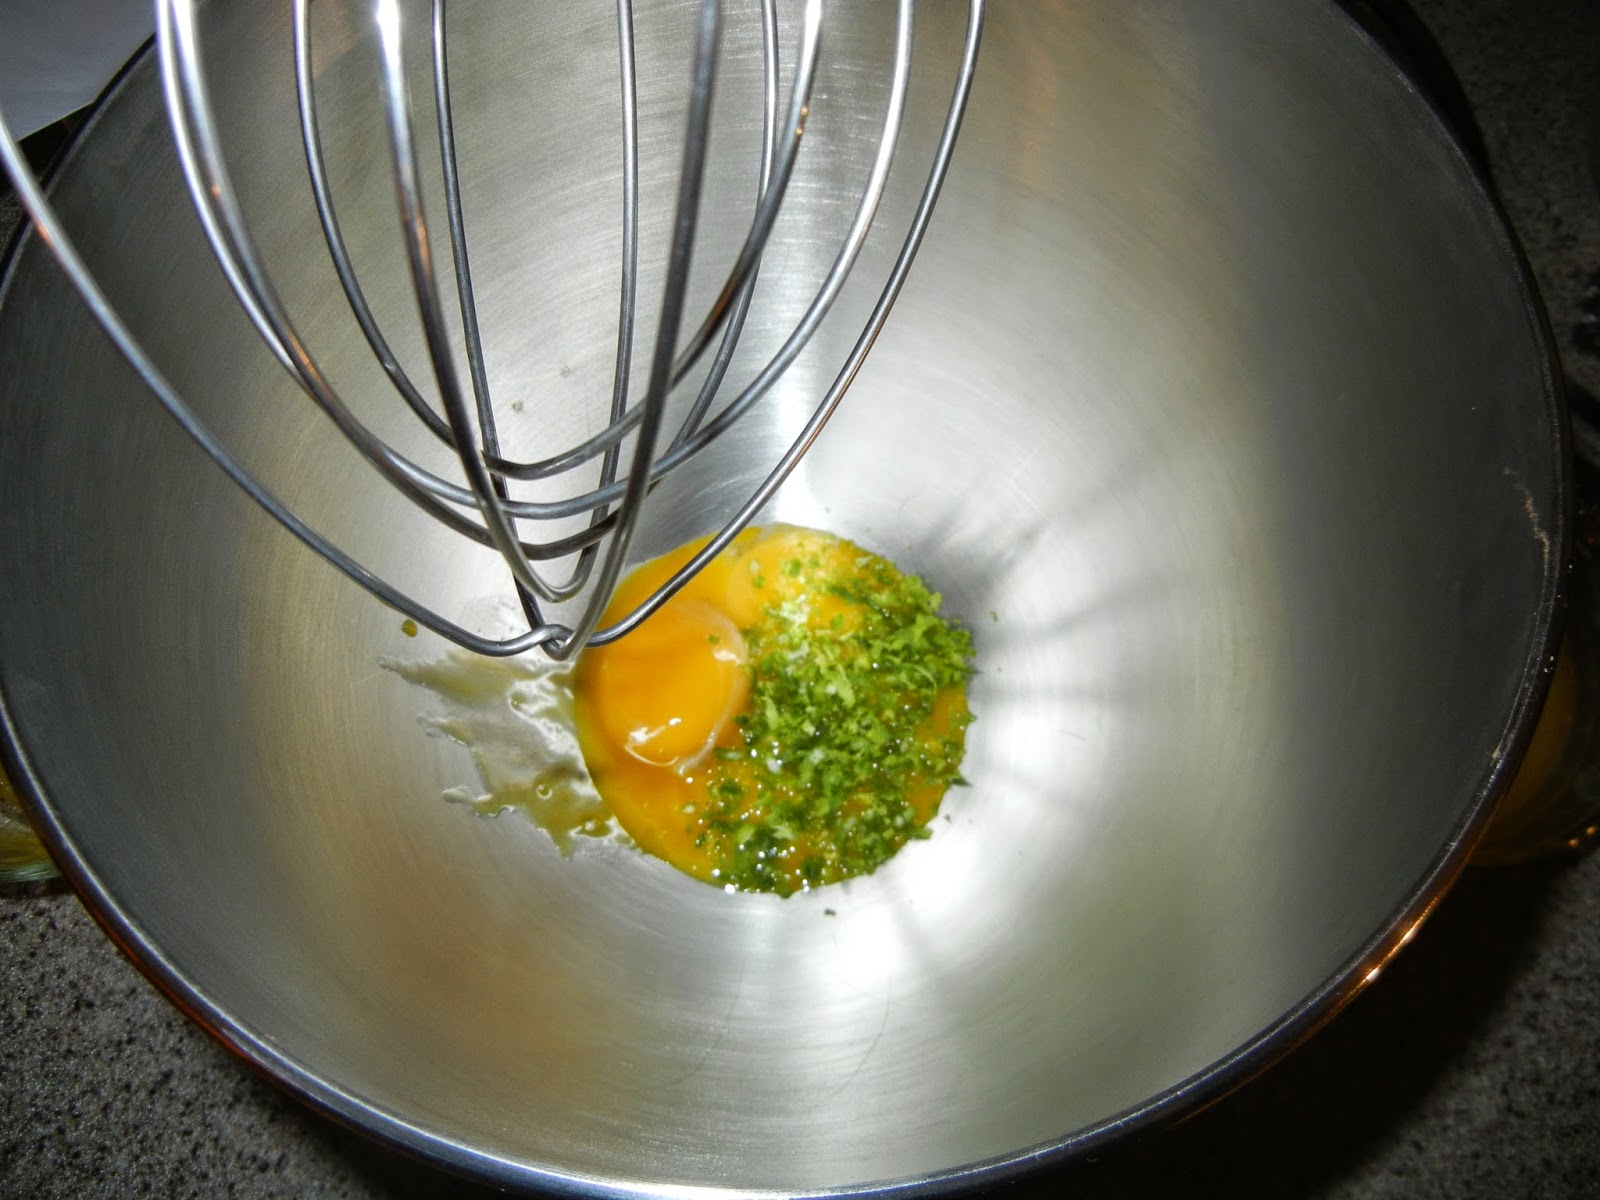
After you've started your waffle iron's preheat it's time to separate your eggs. For this recipe we will actually use both halves of the separated eggs, so it is important that you take your time and keep both halves as pristine as possible. Put the whites, and the yolks in to two separate mixer safe bowls. (If you don't know how to separate eggs here is an older tutorial of me separating eggs.)


Now we have cleanly separated eggs we are going to cream our yolks with the sugar. Add the sugar to the yolks and whisk vigorously (yes, really) until the yolks come to what is called the "ribbon stage". Their appearance will be a lighter color, and will drizzle off your whisk in thick 'ribbons' back to the bowl.


Now to the yolks add the cooled melted butter, milk, and vanilla extract and whisk to combine. Once you've done this add your flour, baking powder, and salt. All websites note at this point not to over combine, which I believe I did while making this. The batter should look slightly lumpy, yet combined. It should not look too smooth. I will also say at this point this batter will appear waaaaaay thicker than you thought it would at this point, chillax it will loosen up before we bake.


Next grab your hand mixer, and egg whites because we need to whip them to what is referred to as 'stiff peaks'. When you begin mixing make sure you start at the lowest setting possible, otherwise you will end up wearing your egg whites. After some air has finally been whipped in the to the whites and it appears almost soda-ish, put the spurs to it a little more. After a minute or two go full bore and turn your mixer up to it's highest setting. When the eggs are done they will have a pearl sheen to them, and when you stop, turn off, and pull up your mixer two 'peaks' will stick straight up off your blades. It'll take between 3 to 5 minutes depending on your mixer, time, date, altitude, state, and attitude.


Now we have both parts of the waffle batter made, we are going to combine them using the 'folding' method. Folding is NOT stirring. To fold you must put about a third of the egg whites in to the yolk batter, cut through the middle with a spatula, stir around the bowl once, then repeat gently until the white is incorporated. Then take another third of the white and repeat, and finally the last third doing the same. You will notice the batter is now lighter in color, and has finally loosened up in to a recognizable 'waffle batter consistency'. It will still be more sticky than you expected.


Before you bake your waffles, make sure you spray some non-stick spray on both sides of your waffle iron.

In the words of Arnold Schwarzenegger "NOW VE BAAAKE"!

Using a ladle and spatula (because this is some sticky junk) gently ladle the the batter in to the center of the iron. If you are using a normal square or round waffle make just slightly swirl around a little to help with even spreading. If you are using a Mickey Waffle Iron do the same, and make sure you get a decent amount of batter in the ears. I wish I could give you some kind of exact measurement of batter to ladle, but it really does depend on your individual waffle iron. You'll have to experiment. As a hint though, it's always better to start with too little than too much.


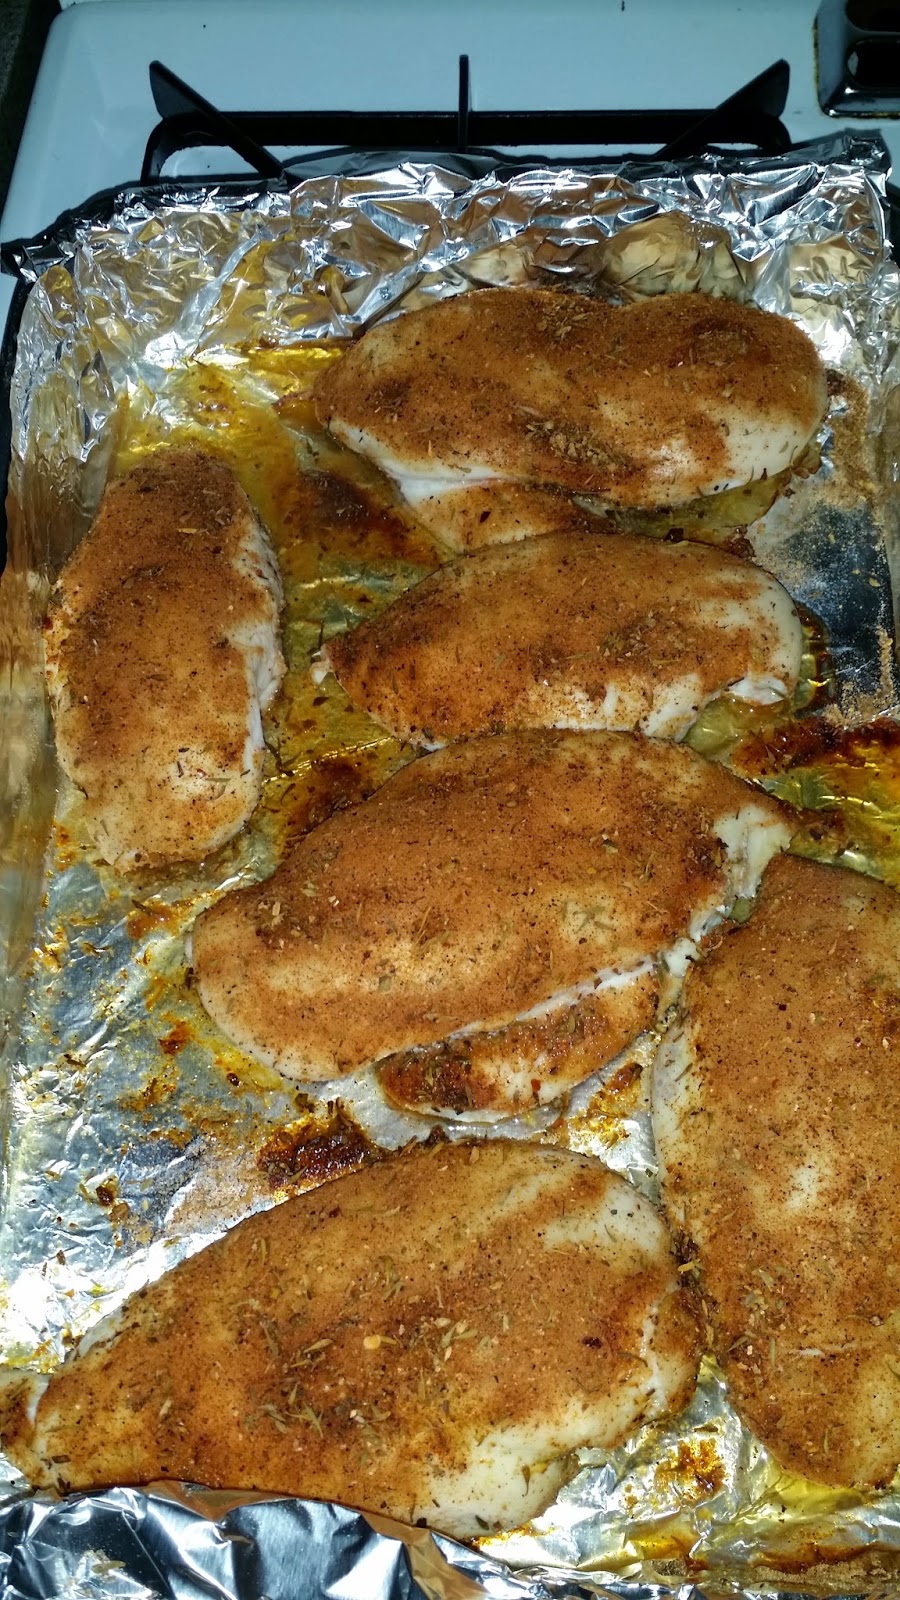
For my Mickey Waffle Iron it take exactly four (4) minutes to get the perfect bake. Your waffle iron (regardless of shape) may differ, again you'll have to experiment. This batter does rise decently, so you will see a gap start to appear as the batter bakes, as pictured below.


Finally when your waffles are golden brown (and delicious) take a fork and nudge under a corner of your waffle so you can pick it up. On your plate now will be one of many fine Mickey Waffles you will make!


The batter we made will make 6.5 waffles using my Mickey Waffle Iron. These taste exactly like the Mickey Waffles you will get at WDW, and are sure to bring back memories of sunny days and great family adventures! Yes the iron is different, that's because currently Disney does not sell the 'official' Mickey Waffle Irons. If you like the looks of what you see, I bought my iron at Kohl's (http://www.kohls.com/product/prd-1851881/disney-mickey-mouse-waffle-maker.jsp?skuId=Mickey+Waffle+Iron&search=Mickey+Waffle+Iron&submit-search=web-regular). There are many Disney waffle irons you can get, so do your research and purchase what you wish!

I hope regardless of the shape I've brought you a great weekend waffle recipe you and your family will love for years to come! If you're a Disney Nerd or Junkie like I am, I hope this brings back all the wonderful memories you have and will have at WDW! Eat well everyone!


*Side Note:  Upon reflection I would recommend using a piping bag, or cut off ziplock bag to pipe in the batter instead of using a ladle. That should reduce some of the slop and trouble with the stickiness of the batter!

FIRE HAZARD BACON


So my girlfriend and I are in the grocery store and notice that some seriously thick cut bacon is deeply discounted. Being bacon lovers OF COURSE we are going to purchase said lovely bacon, despite the encroaching expiration date (the reason for the sale presumably).

A week later she reminds me we need to hurry up and use the bacon. I was grilling that night, and knowing how thick cut it was I decided to try grilling it. The result was a HYSTERICAL grilling experience with a great finished product (seriously, it redefines bacon, sort of).

For this recipe you'll need:

Ingredients:
1 Package of Premium Thick Cut Bacon

Equipment:
1 Grill (Gas or Charcoal)
1 Grill Pan
Grill Tongs
Water Hose, or Fire Extinguisher

At some point I will blog about grilling in depth, especially concerning charcoal, but not today. Right now you need to heat up your grill, and get it ready for normal use.


Not all bacon is equal. Regularly sliced mass produced bacon is too fragile, and doesn't bring enough flavor to stand up to the grill. You will end up with extremely salty carbon. The bacon you want to use is the absolute thickest cut you can find, and will have an apple wood, or pecan wood flavoring to it. That way the bacon will survive cooking, and the flavor will be able to survive the additional smoke flavor it's going to receive.

I didn't get to document my first crack at this, so I recreated it for your reading pleasure. I'll admit the original Hormel product show below turned out better, though the Wright certainly was tasty when finished.


If you've never used or even heard of a grill pan, it's pictured above. Basically it's a pan with a bunch of holes in it, to let the smoke get to your food. It's quite versatile, and if you don't own one, I'd recommend you get one. You can pick them up almost anywhere, and typically they're between $13-$30.

This by far is not the most complicated dish I've made, because basically you just make bacon. You put the pan on the grill, let it heat up, and carefully put the bacon on the pan. You'll hear the stereotypical crackling and popping, and the bacon will start to become translucent.


Where the entertainment comes in, is when the fat starts to drip through the pan.

Sunday, February 15, 2015

Dinner Quickie 1 - Bacon BBQ Chicken Breast


Traditionally I would credit a website, chef, or cookbook at the top of my blog. This time around this is an invention my better half and I came up with on the fly when we were sick of the 'same ole, same ole' and didn't have the cash to eat out. So great job Suzi!

As you probably guessed by the name of my blog, I'm a dad. I love being a dad, really it's one of the highlights of my life. BUT (as all parents reading this know) with being a dad comes all sorts of stresses, responsibilities, and tight schedules I would have never conceived of as a younger man.

I know other parents read the above paragraph and nod their head in agreement. Such is the life of the modern American. Like other Americans one of the casualties of the war that is parenting many times is dinner. Sometimes it seems like there is just not enough time to work, pick up the kids, and get a decent dinner on table. Fortunately there are some short cuts you can take that won't sacrifice budget, time, or flavor. I am constantly on the prowl for such short cuts. CONSTANT VIGILANCE!!!

For this recipe you will need:

Ingredients:
Boneless Skinless Chicken Breast - Enough to feed your family
Thick Cut High Quality Bacon - Enough for two strips of bacon per chicken breast
Pre-made BBQ Sauce - Whatever is your favorite, I use Famous Dave's
Emeril's Original Essence Seasoning
Pre-Shredded Cheese - Whatever is your favorite, I used Sargento Mexican Shred

Equipment:
Tin Foil
9x13 Baking Pan
Non-Stick Frying Pan
Oven
Microwave (gasp!)
Plate Lined With Paper Towels

Before We Begin:
I love cooking. I love making things from scratch and learning new skills, I actually pride myself on that quality. I believe we as a society should get back in the kitchen more often and learn to make 'real food' the way our grandparents used to, because it's just that much better tasting, and better for you. BUT I work 50-60 hours a week. On average I don't get home until after a certain time of day. I help clean the house, I help with homework, blah blah blah. SO though this recipe may not require you to toast, grind, and mix spices or make home made BBQ sauce, it will taste pretty darn close. So don't "be hatin'".

Please pre-heat your oven to 350 degrees.


While the oven is heating up go ahead and get your tin foil and 'line' your baking pan with it. Basically just tear off a piece of foil longer than the pan, and push it down until it looks like the pan above.

Take your chicken and put it in the lined pan. Liberally sprinkle Emeril's Original Essence (or your favorite poultry seasoning or rub) on the chicken, and rub it in. Flip the chicken breasts, and repeat on the other side. I will note that I am not using any non-stick cooking spray, it's not necessary for oven baked chicken as it tends to be pretty juicy on it's own.


Once your oven hits 350 degrees put your chicken breasts in on the middle rack, for 30-45 minutes depending on your oven, barometric pressure, humidity, and the mood of the chicken. You are looking for the chicken to be cooked through, but not crispy crittered being as you're going to microwave this for a minute or two later on. Personally my oven usually takes 38 minutes for 6 chicken breasts.

While the chicken is in the oven let's turn our attention to the BACON.

I've always been a proponent of using higher quality bacon, which of course will hit you up for a higher price. BUT I have discovered recently at Kroger, Meijer, and a local grocer that the 'case bacon' (you know the bacon in the butcher's case you've been ignoring for years because "surely we can't afford that") IS ACTUALLY FREAKIN' CHEAPER THAN THE GOOD STUFF VACU-SEALED IN THE REFRIGERATED SECTION WITH THE REST OF THE BACON!!! BY UP TO A BUCK A POUND!!! So I've been using that lately.

Cooking bacon is not difficult though it can be rather harrowing on the pan with all the popping and splattering that can occur. To minimize smoking, splatter, and traumatizing experiences I recommend cooking with a flame no higher than the "medium" setting. Simply put the offending pig candy in the pan, brown one side until the bacon has reduced in size, flip, and repeat. When the bacon is done to your liking take it off and put it on a plate lined with paper towels. Now wait for your chicken to finish baking!

Tip: You can do this bacon a day or two before. Point of fact I've made this dish once using bacon I had made for a Sunday breakfast I cooked for the family and had left over.


Once the chicken is done take it out of the oven, and allow to rest for roughly five minutes.


Now all we left is assembly, which is a snap. Put the offending chicken on a plate, and cover with as much or as little BBQ sauce as your wish. Then put the bacon on top of the sauce, then cover with as much or little shredded cheese (mmm cheese) as you want. Microwave for 30-90 seconds, and you've completed this dish!


Other than the taste and ease of cooking, and assembly of this dish, the best part is this literally took 45 minutes from fridge to table. That's it. Even better the predominance of the time it takes to make this is oven time, so you have down time to clean or help with homework while it's doin' it's thang.

I will also say I've yet to see an unhappy face about this one. Picky eaters, not so picky eaters, and everything in between seem to love it.

I hope I've helped everyone reclaim dinner time for at least one night a week, and I hope everyone enjoys this easy and relatively cheap dish with their loved ones! Eat well everyone!

Sunday, July 13, 2014

Key Lime Pie... An Addiction Story


The original recipe for Key Lime Pie can be found on FoodNetwork.com at http://www.foodnetwork.com/recipes/key-lime-pie-recipe1.html courtesy of Joe's Stone Crab Restaurant.

I love Florida, it's my favorite place on this planet. I also love pie, it is by far my preferred dessert above all else. The first time I tried Key Lime Pie was in Florida (fitting), and since then I have been hooked on this cool, creamy, tart lovely. I love how it's so contradictory to itself, yet it works. Sweet versus tart, the lime screams refreshing while the texture screams decadence and luxury, then the graham cracker grounds everything and makes you think "homey".

Sadly many people have had a tenuous relationship with this treat. Often when you talk to people about Key Lime Pie they constantly talk about the large swing of awesomeness versus suckatude they've experienced. Frustratingly this is caused by the usual suspects in food, odd preservatives, fake flavoring, and fake coloring easily ruin something that is supposed to be simple and balanced. If you've had a bad experience with Key Lime Pie I ask you to remember one thing, any food can be ruined by such things... give it one more try.

For this recipe you will need:

Ingredients:

For the Crust:
1/3 of a pound of graham crackers
5 tablespoons of melted unsalted butter
1/3 cup of sugar

For the Filling:
3 egg yolks
2 teaspoons key lime zest (1 teaspoon key lime zest)(will discuss later)
1 14 ounce can of sweetened  condensed milk
2/3 cup of fresh squeezed key lime juice

For the Whipped Cream:
1 cup heavy whipping cream (chilled)
2 tablespoons confectioner's sugar (powdered sugar)
(1/2 tablespoon or more vanilla extract)(will discuss later)

Equipment:
Stand Mixer or Hand Mixer
Food Processor (optional but recommended)
Disposable (preferred) or Reusable Pie Tin
Hand Juicer or Squeeze Juicer (preferred)

Before you begin pre-heat your oven to 350 degrees.

I want to get something clear before we go too far in to this process; Key Lime Pie is NOT supposed to be green. I said it. It's true. Deal with it. If you see Key Lime Pie that is actually green, I would steer clear of said product. Now we may begin.


Step one is the crust, being as it's hard to have a pie without it.

Begin by setting up your food processor, and putting your graham crackers in whole. Your going to pulse the crackers about 10-12 times until they are broken up pretty well. My food processor only has "pulse" and "on" as options, so go ahead and give your graham crackers a spin until they are a uniform consistency. Be careful not to OVER process them though, we are not trying to make a 'graham flour'.

Should you not own a food processor fear not, for you are not screwed! You can process your graham crackers by getting a gallon size Ziploc bag, and crushing them with a rolling pin until you are satisfied with the consistency. The reason I use a food processor? Pure, laziness.


(picture above is after pulsing, you want them more consistent and smaller for end product)

When your graham crackers are the proper consistency you may now add your melted butter and sugar. I would recommend if your using the food processor that you pulse the ingredients together before you take them for the final spin. Also you may need to manually mix the ingredients slightly from time to time with a spatula. Once combined go ahead and let the processor mix it for another minute or so, and you'll be ready to poor your mixture in to your pie pan.

If your not using a food processor, simply poor your crackers, sugar, and butter in to a bowl and mix with a spatula or spoon until everything is combined well. Once combined, go ahead and poor the mixture in to a pie pan as stated above.


OK so I'll admit this is the first time making a scratch made graham cracker crust actually turned out well for me. Starting from the middle start to press down the graham cracker, and make sure when you start to spread out you concentrate on getting the graham cracker in to the corners well. Think more 'squish' as opposed to 'spread' as you do this. Take your time, don't force it, keep squishing, and you'll get to the end product desired.

Now it's time to put your pie crust in the oven. Make sure you put it in the middle rack of your oven, do not put it too high or too low. Set your timer for 8 minutes, and when it goes off take out the crust and put it to the side to cool.


Now we get to work on the 'meat' of the pie, the filling! As with many things in life this is much simpler than it appears, but if you're not careful you can make a serious mess of things.

Start by doing all the foot work prior to trying to mix things. I tend to try and get things that are a pain the butt out of the way first, so I started by separating my eggs. If you want a tutorial on separating eggs, please refer to my Creme Brulee post. There is a video that will guide you step by step.

Next you can zest your Key Limes. Above I mentioned I would talk about the amount of zest that goes with the recipe. When I made this, I stuck to the recipe, and found the Pie was kung pow tart. Yes yes I know it's supposed to be tart I don't need to hear the lecture, but it's also supposed to be somewhat balanced. I actually had to use more whipped cream after all the pictures had been taken, so if you LOVE LOVE LOVE tart Lime flavor, proceed with two teaspoons, for me, I'm going to cut it in half next time. Also remember when you zest try not to zest so much from one spot your putting pith (the white stuff under the green) in with your zest.

Next you can juice the Key Limes you just zested. If you're using a hand squeezer like I do, make sure you cut off the tip of the Key Limes, and aim the hole downward through the juicing hole. That way you wont have a potential Key Lime bomb every time you squeeze. When you have the amount of juice you need, you can poor the juice back through the juicer in to a container so you can get any seeds out while keeping the genuine pulp in with the juice.


Now that all the ingredients have been prepped we can move on to mixing the filling. As stated before this is actually quite simple, but if you don't pay attention to detail you can make a real mess of things.

Start by setting up your stand mixer (use your wire whisk attachment), and gather your sweetened condensed milk, Key Lime juice, Key Lime Zest, and Eggs in reaching distance. If you're not using a stand mixer, make sure you have a hand mixer and a mix-safe bowl. Why am I using a stand mixer instead? Again, pure laziness, and more power.

Start by putting your Lime Zest and Egg Yolks in first. Start your mixer slow and quickly build up speed until you're basically at full power. The goal here is to mix until the eggs and zest start to turn into a lighter yellow color, and will almost double in size. This is going to take about 5 minutes. Once you've whipped your Eggs long enough go ahead and start to slowly poor your Condensed Milk in to the mixture (I'd recommend turning down the speed to about half way for this, just until the Condensed Milk has been poured). Turn your speed back up, and keep whipping the mixture for another 3 to 4 minutes (I went with four). Over the course of the whipping you'll see yet again the mixture will lighten slightly in color and expand in size. Turn your speed down by half again, and slowly pour in the Key Lime Juice into your proto-pie mix. DO NOT turn your speed up, and let the two liquids combine. Once the Key Lime Juice has been incorporated, stop. You do not want to over whip once the Juice is in.


Pour proto-pie filling in to your now cooled graham cracker crust, and again put your pie in to the middle rack of your oven. Set your timer for 10 minutes and DON'T STARE AT IT WHEN IT COOKS! Once you pull it out it will look barely cooked (perfect), and you can set it to the side and let it completely cool.


Once the pie has been out of the oven for a bit, and is cool to the touch on the underneath, put it in your fridge (Key Lime Pie is supposed to be cold after all). I'm not entirely sure how long it needs to be in there before completely chilled, personally I left it in over night.

The next day I decided to do a touch of decorating before I served this pie up. You can decorate this however you see fit, or not at all. If you want whipped cream but hate piping, just make the whipped cream and put a dollop on top, or on the side when you serve.

Using the same stand mixer with the same wire whisk attachment, put the aforementioned Whipping Cream, Confectioner's Sugar, and if you follow my recommendation the Vanilla Extract (the original recipe does not call for the Vanilla Extract, but it's a personal preference for me, otherwise you just taste sugar). Start your mixer on slow, let it work some air in to your proto-topping, then continually build speed until your are on high. Leave it on high until the topping basically doubles in size, and you can dip the whisk in and get something called "stiff peaks".

("Stiff Peaks" means you can take your whisk attachment off, dip it in the whipped cream, and when you bring up your whisk the Whipped Cream's point or "Peak" will only dip slightly if at all, not droop over. Be careful though, whip it too long and you'll make butter.)

I happen to own quite of a bit of piping equipment, and enjoy such things, so I decided to bust out a piping tip and decorate my Pie. I was out of piping bags so I simply grabbed a Ziploc bag and cut off a corner. You can pipe like this too, even without a piping tip if you wish. Pictured below is the final product.


If you wan the clean cut look you see above, freeze the pie for 20 minutes before you slice. This will make sure it keeps it's shape.

I love this recipe, and more importantly this Pie. The texture is bang on, it's delightfully tart, sweet, and the graham cracker crust absolutely rounds everything off perfectly. I for sure will make this again, probably a couple times, this summer alone. Make this for your friends and family and you'll impress for sure. Everyone will think this took hours upon hours to make, when in reality it only takes about a hour and a half. Eat well everyone!

(By the way, notice... no green except for the actual Lime)