Showing posts with label Baked. Show all posts

Saturday, March 31, 2012

Baked Fish and Chips Gubna?


The original recipe for Baked Fish & Chips I used can be found on Food Network's page at http://www.foodnetwork.com/recipes/food-network-kitchens/baked-fish-and-chips-recipe/index.html Courtesy of Food Network Magazine.

OK so thus far on Idiotdad we've covered a wide spectrum of items. From Frite's to Gumbo to Carrot Cake. This week I wanted to concentrate on reusing some ingredients I had used on the blog before, and stay on the healthier side. It's fun to cook with tons of butter and sugar and Frank's Red Hot sauce and things, but like everyone else I do need to concentrate on keeping things lighter these days. The blog is called Idiotdad not Fatdaddy. Thus we stayed on the lighter side by doing a Baked Fish and Chips recipe I found on Foodnetwork.com. This recipe uses the Frites I posted before, as well as many other ingredients we've used in the past. I also liked the idea of this recipe because it's an entire meal, not just one dish.

A note or two before we begin. We will be working with fish today. Fish while healthy, has crazy potential for food born illness. Please Please PLEASE wash your hands often when handling raw fish, and please make sure you cook it thoroughly. Bake times swing wildly from oven to oven, I will give you the times and temps I used but keep your own oven in mind.

For this recipe you'll need:

Frites:
3 Medium Sized Russet Potatoes
1/4 Cup Olive Oil
Pinch of Cayenne
(if you are offended by cayenne you could substitute Old Bay Seasoning, Garlic Powder, Onion Powder, or any other flavored savory powder your heart desires)
Kosher Salt

Fish:
Olive Oil Cooking Spray
2 3/4 cups of Rice Krispies
Kosher Salt and Fresh Ground Black Pepper
3 large egg whites
1 1/2 lbs. boneless skinless Cod (any white firm fish will do though)
Tartar sauce

Before you do anything set your oven to 475, line your frite pan with foil and put it in the oven. Also make sure your racks are on the top, and bottom rungs in your oven. Proceed with making your frites.

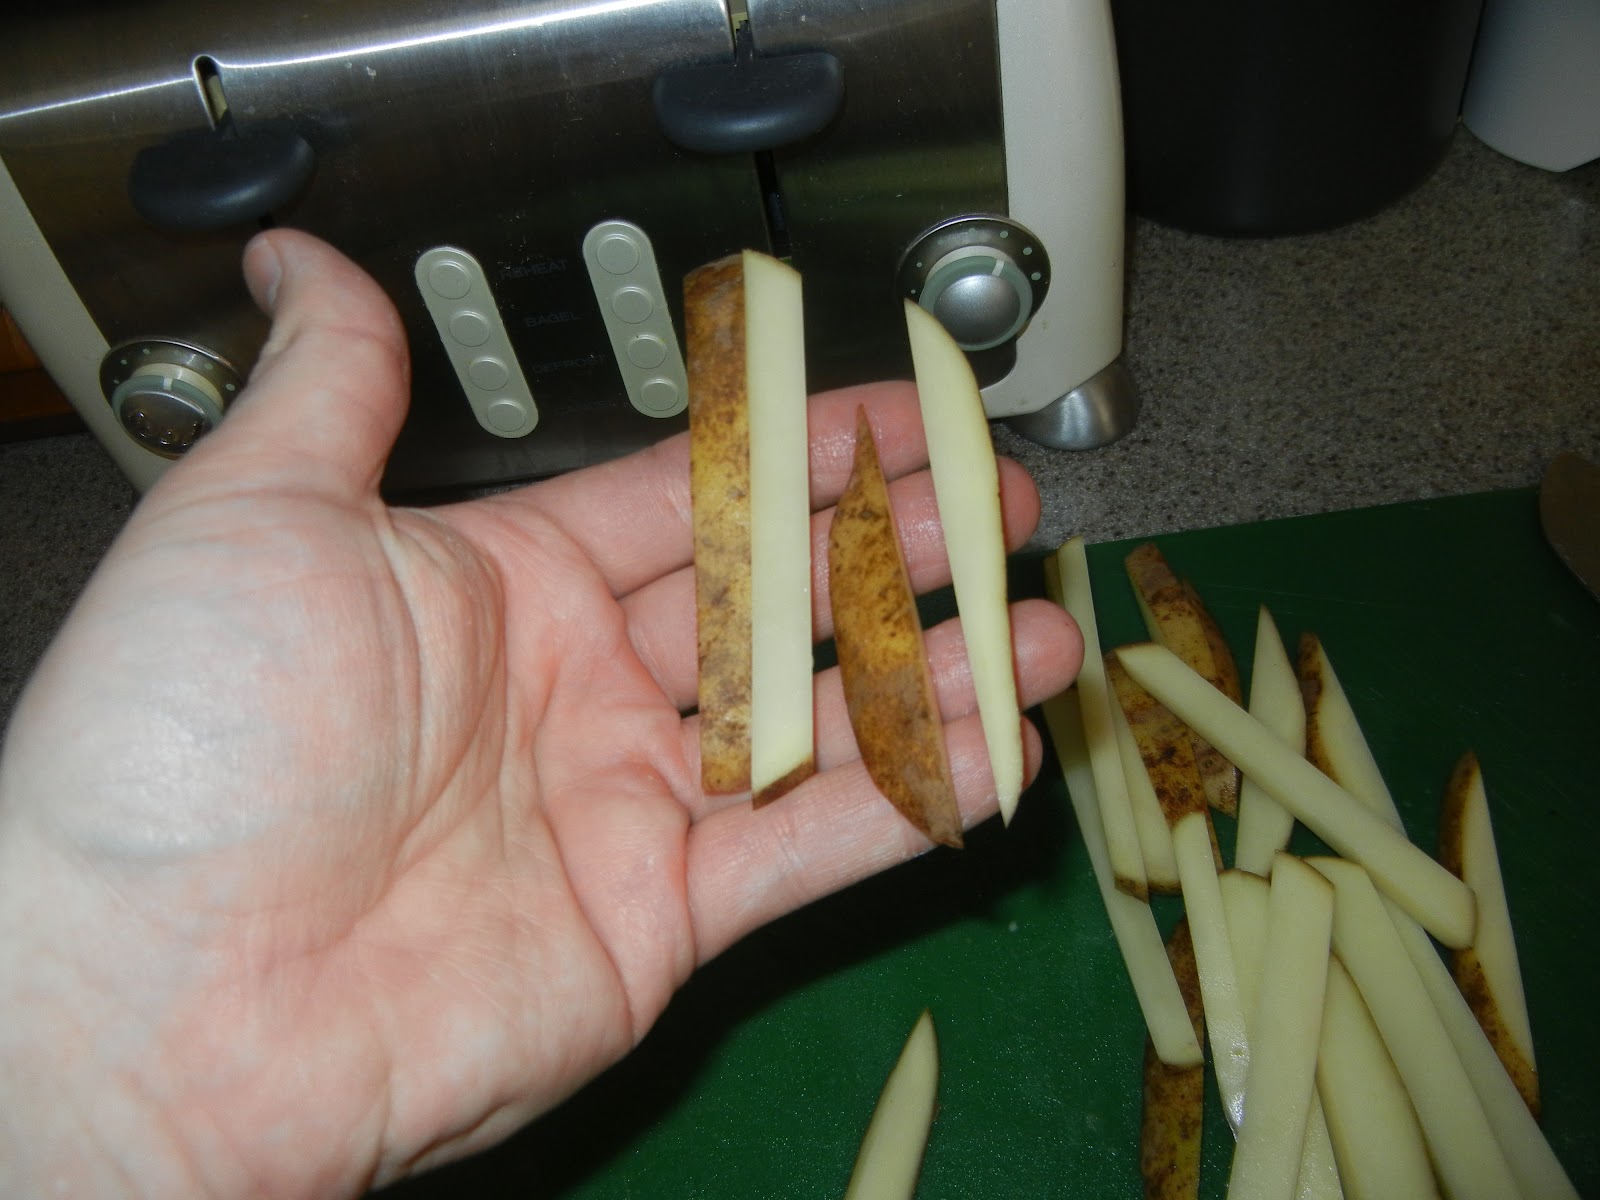
We've already covered how to make frites in the past. Click here <http://idiotdadcooks.blogspot.com/2012/02/easy-oven-frites.html> for in depth instructions on how to make them. I will say this time we are using less olive oil, and we are actually whisking in a pinch or dash of cayenne to the oil before coating the frites. DO NOT BE SCARED OF CAYENNE! It's very tasty and will NOT burn you if used in moderation and evenly distributed. Below are some pics of the frite making process used for this dish today.


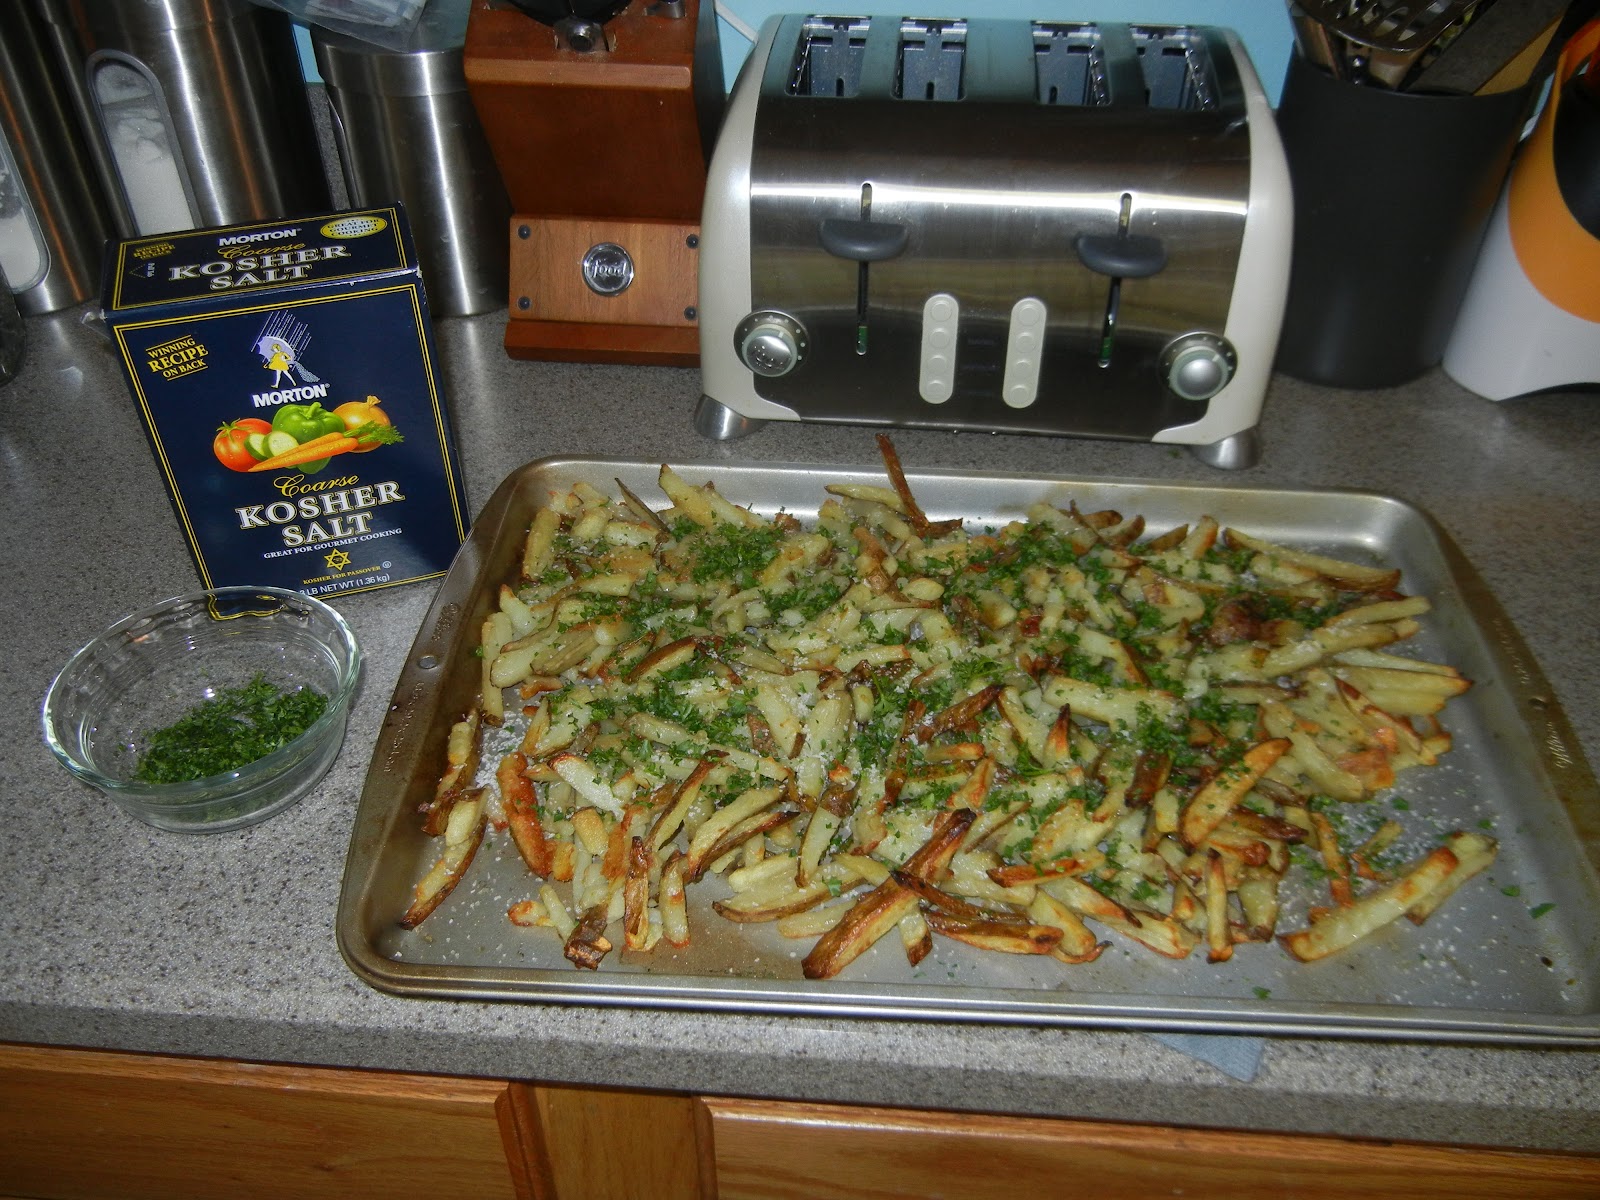
Feel free to pop these in the oven while you work on your fish. 15 minutes on the top rack, rotate, and another 15 minutes after that. Make sure you salt your frites after you take them out of the oven, your final product should look like this.


While your frites are in the oven line another baking sheet with tin foil, and put two wire racks on it. Spray liberally with Olive Oil Spray (Pam makes a great version of this) and set that to the side.


We now are going to learn how to do what's called a dredge. Measure out your Rice Krispies in to a bowl, and crush them. Crush them well, and actually make them more fine then what is pictured ahead. I learned this too late in to the process, a finer crush will coat the fish better than what you'll see. Salt and Pepper this mixture to your liking, and mix thoroughly. In a different bowl, separate 3 eggs and keep the whites in the bowl, you can discard the yolks we will not need them for this recipe. Put a dash of salt in the whites, and whisk until frothy. Set the two bowls aside. For those who do not know how to separate eggs, you're in luck, that this week's video!


Now you can set up your cut board and cut your fish in to roughly 4"x2" portions. Once you've cut them to size dip the fish in the egg solution, then put it in to the breading bowl. Coat the fish in the Rice Krispies well, and put it on the wire rack. I would like to point out, you really should use a two handed approach to the dredge process. One hand picks up the cod, puts in the egg, and rolls it around and puts it in the breading mix. The other rolls and coats the cod in the breading, and transfers it to the wire racks. This will help reduce "club hand". Repeat this until all your fish is well coated, and on the wire racks.


Now for my oven it took about 14 to 18 minutes to cook this fish and get it right. Watch yours closely but do not open the oven too often. The final product should look like what is below. The fish should have some give when you poke it but be relatively firm. Plate the frites and fish together, and dish out the tartar sauce baby!


This is a very nice dinner for any couple or family (fish and chips usually does well with kids). It's light, but it certainly is filling as well. It's also relatively low in fat, and has a lot of good nutritional value. Also it's quick, this whole thing would have taken me a half hour to prep had I not been wrestling around with the camera! All in all this should take about one hour start to finish. Give this try some time, I'm certain you'll enjoy it! Eat well everyone!

Saturday, March 24, 2012

Mmmmmm... Wings.


Normally at the top of every blog I would credit any websites or chefs that invented the recipe I used for that day. Today I actually invented the recipe we will be using from my own experience and research over the course of my cooking past time.

I love Buffalo Wings. Period. There are very few entree`s and fewer appetizers I love more than wings. Thin sauced, thick sauced, a lot of sauce, little sauce, it doesn't matter. I love good wings. Today's goal was to try to create a quality wing recipe from my head and experimentation, and I believe I succeeded. This recipe is a very basic wing recipe, that can be either be made straight up or bent to serve your own creativity.

For this recipe you will need:

1/2 cup Frank's Red Hot Sauce
1/4 cup melted butter (salted or unsalted depends on you)
1 tsp. Worcestershire
1/8 tsp. Cayenne
Approx. 3lbs. Chicken Wings

Before we get to the down and dirty I want to address some food safety here. We are using raw chicken. I'm not paranoid but I am intimately aware of the crazy stuff that can come from handling raw chicken. Please pay attention to what you are doing, and touching. Also PLEASE PLEASE PLEASE wash your hands often.

OK the first thing you'll need to do is set your oven to 375. (I realize most wings are fried, but honestly I didn't want the mess and hassle this time around) You'll also want to set up your cut board and get a good knife ready, because you'll likely need to perform some surgery.

The wings I bought came packaged as below. Unlike in your grocers freezer section or how you see wings in restaurants they come as whole wings. This is not really a big deal. You simply take a wing and cut off the "tip" section at the joint. You can discard the tip, we will not be using them. Then I found it easiest to stand up the wing joint down, and cut into the joint attempting to get your knife in between the bones. Once you've got the process down, this will go quickly. Just set them on a plate on the side until you've completed the surgery portion of this dish. I hope the pics down below help, it's difficult taking super helpful pics on your own while working with raw poultry.


Before the next step, please take out your sheet pan and cover it with aluminum foil, then spray it down with Pam. Don't be scared to be liberal with the Pam by the way, chicken stuck to a pan is never fun. Set the pan by your sink.

After you've cut up all your wings, take your plate to the sink and run cold water over them, trying to get a decent rinse on all the pieces. Have a few paper towels handy, and one by one dry off the chicken, after which set them on the pan. Continue this process until you've washed, dried, and placed all your chicken.


Place your wings in the oven and set your timer for 10 minutes. After your timer goes off quickly flip all your wings over, and put them back in the oven for an additional 10 minutes. Now, on the nectar of the gods, BUFFALO SAUCE!

For as good as buffalo sauce is, it's dumb how simple it is make. In a bowl simply mix the all the ingredients listed above. Use a whisk to combine everything, and simply dip a spoon in and taste. If it doesn't taste "deep" enough, use more Worcestershire sauce. If it's not hot enough use more cayenne (CAREFULLY). As mentioned before the recipe I came up with is very basic and can be customized very easily to suit your individual wing craving experience.


Pretty soon your wings should be done baking. They should appear pretty similar to the picture below.


Now the fun part of making wings is "coating" the wings with sauce. This is done with a bowl, preferably metal. Simply put your wings in the bowl, add the sauce, and toss. I included a video of this process to illustrate how it should be done.


Now as I said in the video that CAN be your finished product if you wish. Just please be sure the chicken is cooked thoroughly and you're good to go!

IF you like a more baked in flavor, set your oven to "Broil" and let it heat up for a few minutes. Finish coating all your wings and set them back down on the pan. Once your oven has heated up, put your wings under the broiler, for about 6-8 minutes. Longer if desired. The finished product should look like the picture below. (on a side note: you can also toss them in sauce a second time after you've broiled, which is what I plan on doing the next time I make this recipe)


The smell is fantastic. When I plated as you'll see below I kept some wing sauce for additional dipping, and put some celery and bleu cheese on the dish as well. Believe it or not, that's it. That's all it takes to make wings at home, about 1 hour front to back. They're simple, they're delicious, and best of all they're easy. Eat well everyone!


Saturday, February 11, 2012

Easy Oven Frites


The original recipe for Easy Oven Frites can be found on http://www.family.go.com which is the Disney Family website.

For the first post I decided to make Easy Oven Frites, a relatively easy recipe for Frites (fancy word for French Fries) that my daughter and I are wild over! It also utilizes a few very basic skills, and has a great turn out for minimal work. 

The Recipe calls for:
2lbs Russet Potatoes (Idaho's most people know them as)
Approximately 2 cups of Extra Virgin Olive Oil (EVOO for you Rachel Ray fans)
Kosher Salt (sea salt is great too)
1 tbsn of Parsley
1 Clove Garlic (I do not use this, because it doesn't spread evenly or easily enough)

Preheat your oven to 500 degrees F. 

Bring some water to a boil in a steamer pot as well. 


For those who have not done a lot of veg prep, the first thing you do before cutting is wash the potatoes very very well.  This is important so you don't accidentally spread food born contagions. Put your potatoes in a strainer and wash thoroughly with cold water, make sure you dry them afterwards.


Here is a tip for everyone! Before you use your cut board, take a small paper towel and wet it down, wring it out, then lay it flat on the counter top. Then lay your cut board on top of it. I guarantee your board will barely move, if at all. It makes it much more stable, and enjoyable.


Now this is the toughest part of this entire enterprise, the cutting of potatoes in to fry shape. It's not terribly complicated but you need to be careful when doing this. I recommend a santoku knife for the job (pictured cutting the potatoes), though a chef's knife is just as effective. The reason I say santoku over the chef's knife is because I personally feel I have more control over the cut with the santoku when cutting vegetables. Use your preference or whatever you have. Since potatoes are round cut a small slab off of what will be the bottom, to give yourself a flat stable surface to work with.  Then on the "side" of the offending potato cut in about 3/4 of the way through, about a quarter inch apart. Make sure the potato is still attached to itself on the other side.


From here you're going to turn the potato back to the flattened side down, the cuts you made will be on the right hand side, and the "top" of the potato will not have any cuts yet. Start to cut all the way through the potato from the top down. You'll notice immediately the cut off potato pieces will magically be in the proper shape for frites, fries, whatever.


When you've cut through most of the potato you might have a chip sized slice left not in fry form. Go ahead and just put it down and cut it length wise, no one will know the difference.

Once you have cut all your potatoes put them in to your steam pot. Do not overload your steam pot like I did, if it takes three batches that's fine. Smaller loads will help maintain the shape of the fries. Steam them for 12 minutes per load, I wouldn't steam them less because the final texture would be odd, too much longer and you'll be making very complicated mashed potatoes. 


Once you've completed the steaming put the fries in a bowl (I recommend doing this per load) and drizzle (DO NOT DUMP) Extra Virgin Olive Oil over the fries. Gently flip the fries around by bouncing the bowl forward and then up a few times to evenly cover all the fries. If you use the right amount of oil you should not need to strain the oil out. Once you've coated the fries put them on a pan that you have sprayed well with Pam (do not use tin foil, I did the first time and it was not good). 


After all the loads of steaming and coating have been completed put the pan in the oven (preheated to 500F) for 15 minutes. When 15 minutes have passed take it out, stir or flip the fries with a spatula, and put them in for another 10 minutes. This will help ensure crispiness and color. Keep in mind also this is my oven I am talking about and not yours. I don't encourage (actually I discourage) constantly opening the oven to check on food because you lose your heat, but this is also more of a "lookin' thing" not an "exact science". 


While your frites, fries, whatever are in the oven we go back to the cutting board. Because we are not shifting food types you don't REALLY need to wash your knife and board in between (it just depends on how paranoid you really are). Take out about a palm full of fresh parsley (a full palm full) and put it on your board. Make sure you keep your fingers curled in and start to very finely chop the pile until it starts to lose it's bulk. Then make it in to a pile and start to chop it more finely, and repeat until it reminds you more of a pepper grind than shrubbery. It's difficult to describe the technique, but I will say after the initial chop you should be able to keep the tip of the knife on the cut board and go to town. No you don't have to have the fancy little glass Pyrex bowl, but it sure looks Food Network doesn't it ;)


Once your frites, fries, whatever are finished in the oven take them out, and IMMEDIATELY season with the Kosher salt and the fresh cut parsley. IT IS IMPERATIVE YOU DO THIS WHEN THE FRIES ARE SCREAMING HOT OR ELSE THE FLAVORS WILL NOT MIX! IF YOU'VE EVER HAD CRAPPY MCDONALD'S FRIES THIS IS WHY. Also remember before you take the fries out of the oven, the phrase "Golden brown and delicious" (thank you Alton Brown) should apply to the fries.


Above we have the finished product :)

These frites, fries, whatever will ABSOLUTELY change your opinion of Fries for the better. They are lower fat, lower cal., and actually have health value. They are salty, herby, and have a great crunch to them. I even made soup to go with them instead of a burger (though burgers are EXCELLENT with these). 


All in all this is a very easy, very family friendly dish to make. It takes about an hour or so if you have all the ingredients on hand. I wasn't very careful with the first batch size so unfortunately many of my fries lost shape, but I figured out the problem in time to preserve the second steam batch. This is the second time I have made these, and it was WAY easier than the first time, and the first time was pretty dang easy already. I highly recommend this to anyone, for any occasion. This tastes like a 3 hour dish, with way less work and way less clean up. 

Let me know what you think, I'm very interested. Give me ideas for the next challenge! Eat Well Everyone!